By Anna Toma, Rise SA Team
A user guide on how to work in the Bank Stream: how to match, split & approve transactions
1. Definition
2. Accessing the bank stream
3. Matching a transaction to a document
3.1 Matching a deposit transaction in the bank stream
4. Splitting a transaction
5. Allocation transactions to GL Accounts
6. After Approving
1. Definition: a bank integration tool that automatically downloads and assigned your bank transactions.
2. Accessing the bank stream:
2.1. Click on bank on the main menu and select bank stream.
2.2. This will show you all your transactions that were pulled from the bank account.
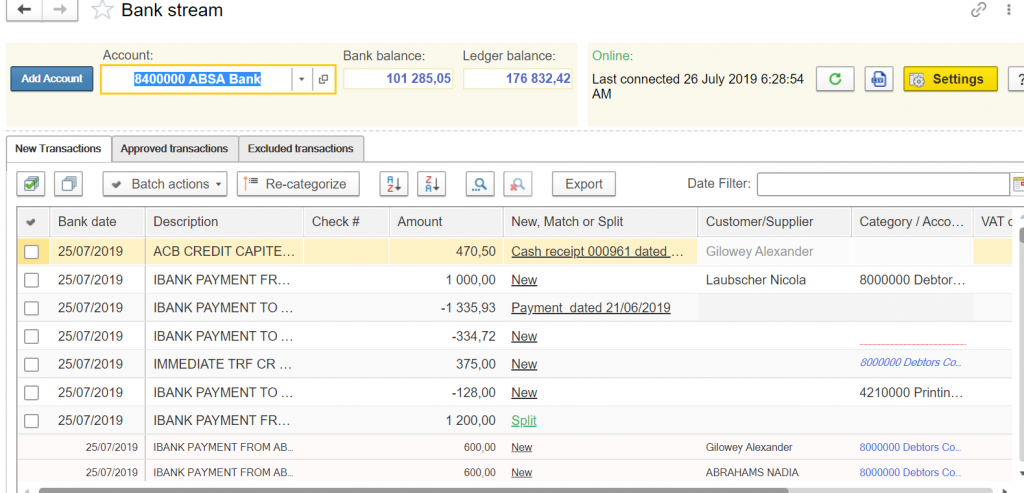
2.3. It will show you the last time it was connected to the bank.
To pull new transactions, click on the refresh button.
2.4. It will also show you the actual bank balance as it currently is on your bank as well as the bank balance on RSM.
To pull new transactions, click on the refresh button.
2.4. It will also show you the actual bank balance as it currently is on your bank as well as the bank balance on RSM.

2.5. It will show you 3 tabs where the first one will list all transactions that have not yet been allocated and posted, the next tab will show a list of approved transactions and the last tab will show transactions that are excluded.

2.6. You can filter your transaction list by dates.
3. Matching a transaction to a document:
3.1. Click on the transaction you wish to match to a document.
3.2. Double-click on the line of the transaction under the New/Match/Split column.
3. Matching a transaction to a document:
3.1. Click on the transaction you wish to match to a document.
3.2. Double-click on the line of the transaction under the New/Match/Split column.

3.3. Select the Match option.
3.4. Find the specific document you wish to match with the transaction, tick the box on the left of the document and click on Match to complete.
3.4. Find the specific document you wish to match with the transaction, tick the box on the left of the document and click on Match to complete.
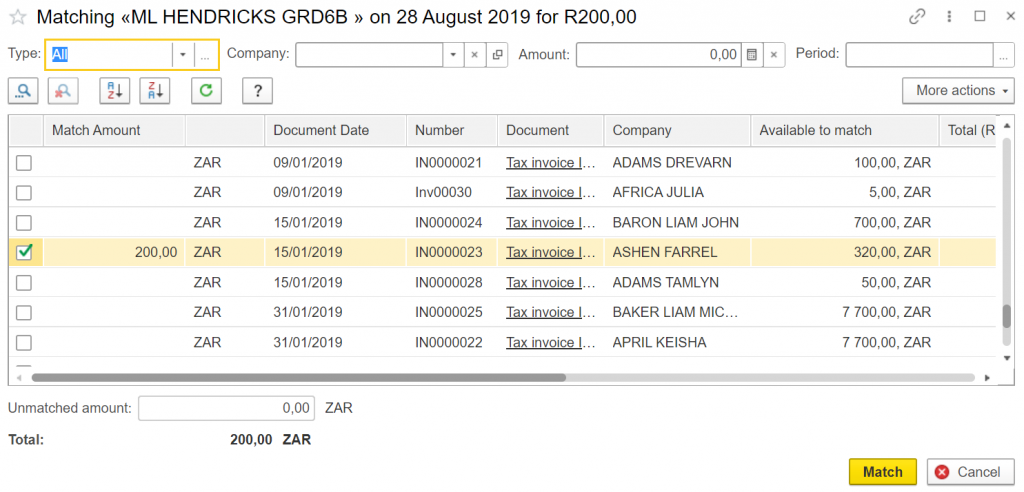
3.5. This will automatically give you the name of the counterparty in your transaction line.
3.6. Click Approve to complete.
3.6. Click Approve to complete.

3.7. Now your transaction has moved to the Approved tab.
3.8. Matching transactions to invoices, if they exist, will make sure all payments and against the invoice and will constantly update the status of the invoice with the balance until it is fully paid.
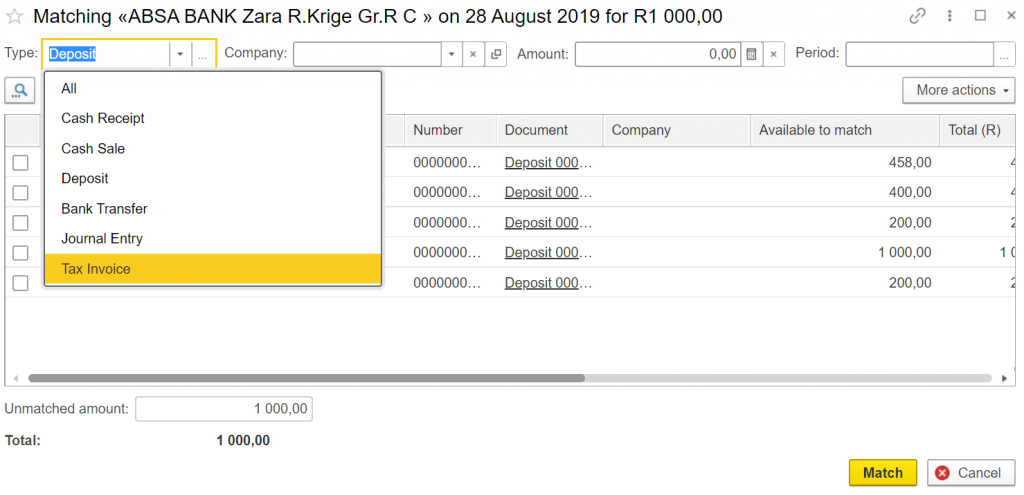
3.9 Matching a deposit transaction in the bank stream:
3.8.1. Whenever you encounter a deposit transaction in your bank stream, you can match it to a deposit document that you have created in the system.
3.8.2. Click on New/Match/Split on the line of the transaction and select Match.
3.8.3. Filter the documents that appear and select deposit. This will list all deposits.
3.8.4. Select the specific deposit to complete.
3.8. Matching transactions to invoices, if they exist, will make sure all payments and against the invoice and will constantly update the status of the invoice with the balance until it is fully paid.
3.9 Matching a deposit transaction in the bank stream:
3.8.1. Whenever you encounter a deposit transaction in your bank stream, you can match it to a deposit document that you have created in the system.
3.8.2. Click on New/Match/Split on the line of the transaction and select Match.
3.8.3. Filter the documents that appear and select deposit. This will list all deposits.
3.8.4. Select the specific deposit to complete.
4. Splitting a transaction:
4.1. Sometimes, a parent pays for two of his children, and you, as the bursar, need to allocate the correct payment under each student.
4.2. Click on New/Match/Split column on the line of the transaction you wish to split and select Split.
4.3. Select the student, the account, and the amount. Click add to add another line for another student.
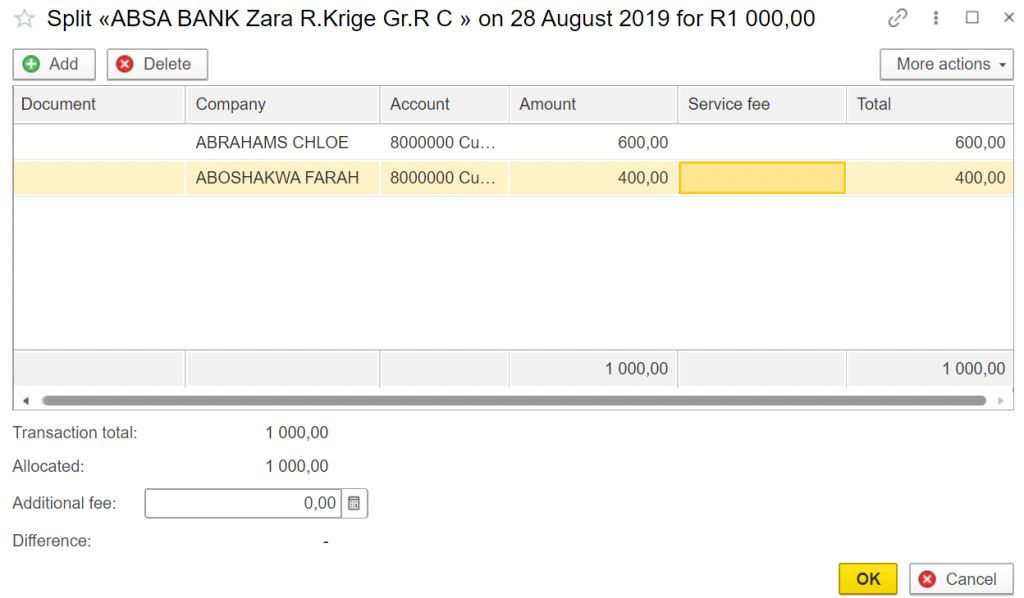
4.4. At the bottom you can see how much still has to be assigned, and you will not be able to proceed until the full transaction amount has been allocated.
4.5. Click Ok to complete.
4.6. The transaction will now appear in multiple lines.
4.5. Click Ok to complete.
4.6. The transaction will now appear in multiple lines.

4.7. Click Approve to continue.
4.8. Your transaction will now appear under the Approved tab.
5. Allocation transactions to GL Accounts:
5.1. Some transactions may have no documents, but must be recorded.
5.2. Click on the Category/Account column on the transaction line.
5.3. Select the GL code the transaction applies to.
5.4. Click Approve to conclude.

6. After Approving:
6.1. After you have clicked on the approve button, the transaction moves to the approved tab.
6.2. Then the system automatically creates a document to support it, if it doesn't have any.
6.3. This proves the Matching Principle in Accounting.
6.4. If you wish to unapproved a transaction:
6.4.1. Click on the Approved tab.
6.4.2. Click on the transaction you wish to unapproved and click the Unapprove button at the top.
6.4.3. This will automatically cancel any existing documents and move the transactions to the New tab.
